
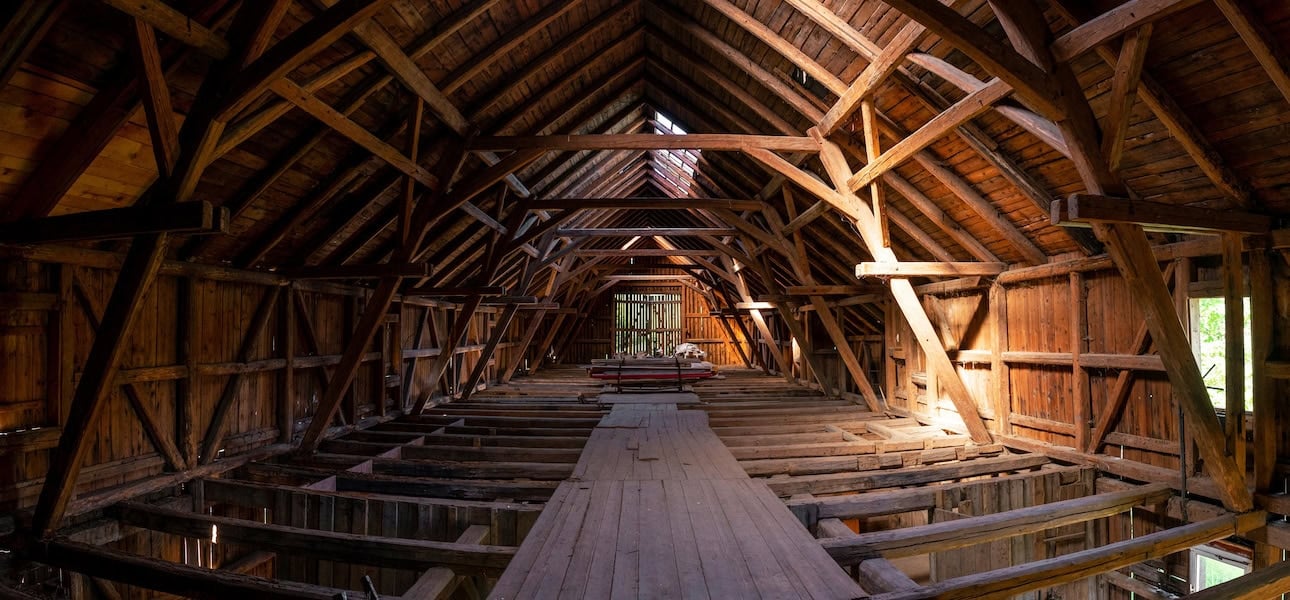
Rough sawn timber is honest material. It comes off the sawmill full-sized, carries the marks of the blade, and costs less than surfaced stock. It is also never quite the size you ordered. An "8×8" from a good sawyer might measure 7-13/16" on one face and 8-3/16" on the next, and the timber beside it will be different again. This guide shows you how to build a frame that is dead-on in its overall dimensions anyway.
Why rough sawn timbers vary (and why that's fine)
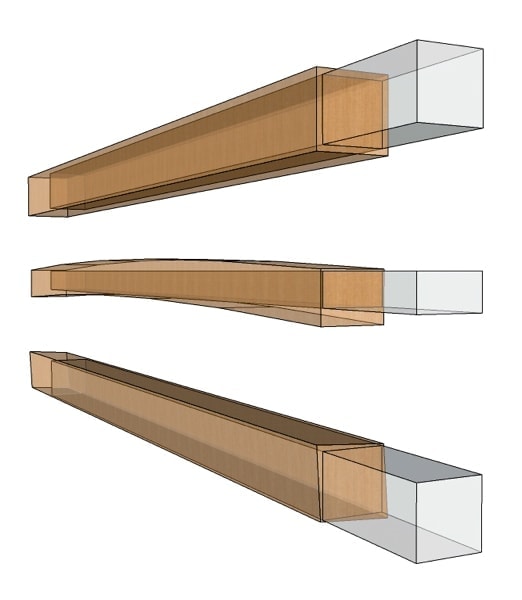
Most framing timbers never see a four-sided planer. Big sections are expensive to surface, and most are sold green because kiln-drying anything thicker than about 6" is rarely practical. So what arrives on the truck is the timber as it came off the saw, and several things make each one a little different:
- Sawing variation. Even a careful sawyer on a well-tuned mill will drift 1/8" or more across a big timber. Portable bandmills and older circular mills can vary more. Engineers who deal with rough stock commonly report 1/4" to 1/2" of variation in depth and thickness.
- Full-sawn sizing. Rough timbers are usually sawn at or near full nominal size. An 8×8 is close to 8"×8", not the 7-1/2"×7-1/2" you'd get from a planer. That's extra wood (and extra strength), but it isn't uniform.
- Shrinkage. Wood shrinks across the grain as it dries, and more in one direction than the other, so a timber can go slightly out of square as it seasons. Length barely changes.
- Bow, crook, and twist. Long timbers rarely stay perfectly straight, especially if the heart sits off-center.
None of this is a defect. Barns built from far rougher stock have stood for 150 years. The point of a layout system is to make the frame's critical dimensions come out right regardless.
Your layout options: scribe, square, and mill rule
Every timber frame is laid out with some combination of these systems. We cover them in depth in Timber Frame Layout Rules and Timber Frame Layout Methods, but here's the short version as it relates to rough stock:
| System | How it works | Best for | Trade-off |
|---|---|---|---|
| Scribe rule | Timbers are stacked in position and each joint is scribed directly to its mate. | Hewn, round, or very irregular timbers | Slow, heavy handling; every piece fits only one spot |
| Square rule | Joints are cut to an imaginary, perfectly sized timber inside the rough one. | Rough sawn timbers, by far the most common case | Extra cuts (housings and reductions) at every joint |
| Mill rule | Timbers are surfaced square and true; you measure straight off the faces. | Planed (S4S) or machined stock | Surfacing cost; doesn't tolerate irregular stock |
Square rule replaced scribing in America in the early 1800s for a very practical reason: it lets you cut every piece on its own, on sawhorses, without dry-fitting the whole frame. Common members, like all the tie beams or all the braces, come out interchangeable. For rough sawn timber, it's almost always the right default.
The core idea: the perfect timber inside
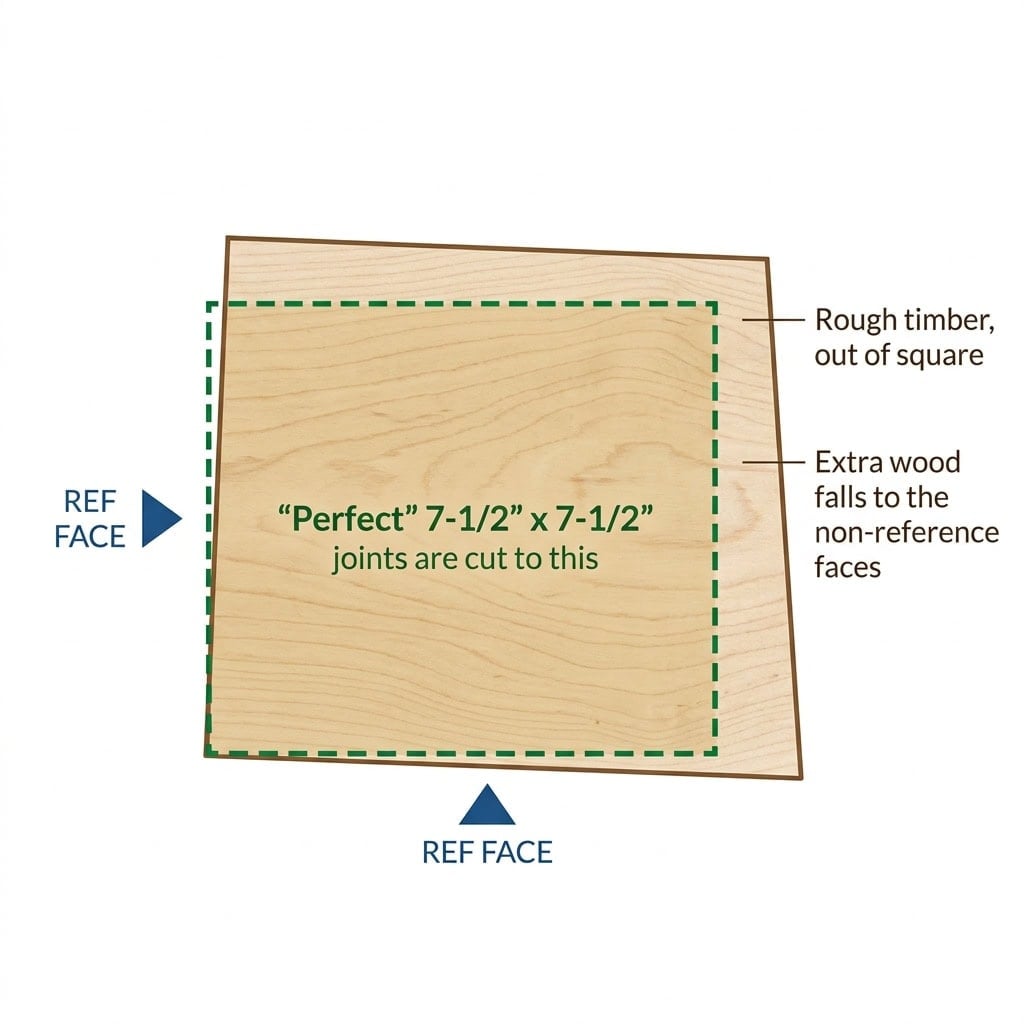
Picture a rough 8×8 that measures 7-15/16" one way and 8-3/16" the other, a little out of square, with a slight bow. Somewhere inside it is a perfectly square, perfectly straight 7-1/2"×7-1/2" timber. Square rule says: lay out and cut every joint as if that inner timber were the real one.
Between joints, you leave the rough timber alone. Nobody will ever measure the middle of a post. But at every place where another timber connects, you cut down to the inner timber so the connection lands exactly where the drawings say it should.
Choosing and marking reference faces
The inner timber has to be anchored somewhere. In square rule, you anchor it to two adjacent reference faces, and every measurement on that timber is taken from those two faces and nothing else.
Rule one: the frame decides, not the timber
Which faces become references depends on where the timber goes in the building, not on which faces look nicest. The governing logic is simple: the dimensions that matter most are the outside dimensions of the frame, because that's what has to land on the foundation and receive the walls and roof. So:
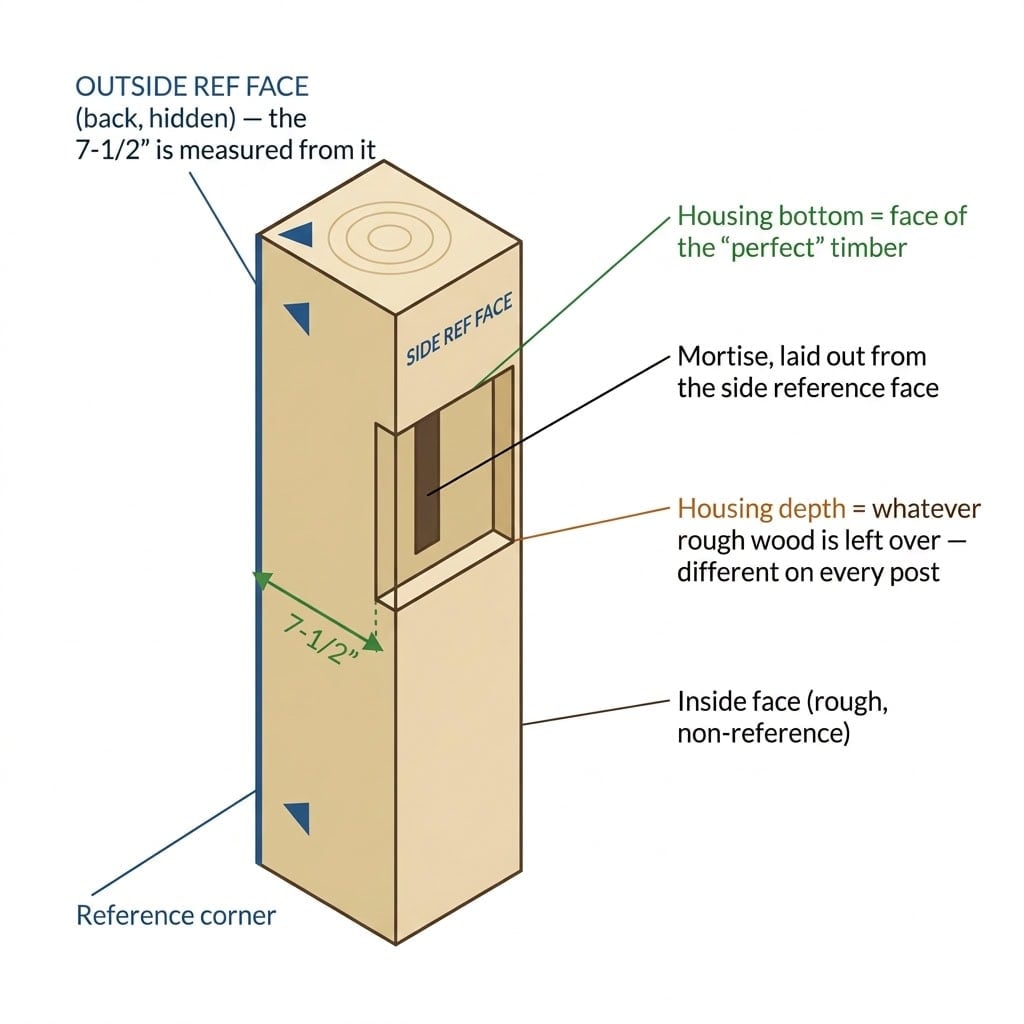
- Posts: the outside face (toward the exterior wall) is always a reference. The second reference is the face that matches the wall line of the frame, typically the face toward the end of the building or a consistent side for all posts in a wall.
- Plates and sills: outside face and top face.
- Tie beams, girts, and floor beams: top face (so floors and anything resting on them land on a flat plane) and one consistent side face, usually the same side as the bent's outside reference.
- Rafters: top face (for roof sheathing or SIPs) and one side face.
- Ridge beams and purlins: top face(s) in the roof plane.
The payoff: all the posts in a wall share a common outside plane, so siding or panels go on flat. The irregularity collects on the inside and the underside, where it reads as character rather than a problem.
Rule two: within those constraints, pick the best corner
When a timber could go in more than one location, sight down it and choose the location where its two straightest, most square adjacent faces become the references. A post with one ugly face can usually be oriented so that face points inward. Check the corner with a framing square at several points along its length before committing.
Mark it so nobody can get it wrong
Mark both reference faces with a bold symbol at each end and near the middle. The classic mark is a pair of triangles (or a "crow's foot") pointing at the shared corner. Use lumber crayon or carpenter's pencil, not something that will soak into the finish. Then add the timber's location ID, such as "Bent 2 – Post A", on a reference face where it will be hidden or easily cleaned off later.
Shop tip
Before you mark a single joint, write a reference-face schedule for the whole frame: every member, which two faces are references, and which end is which. Five minutes with the drawings saves a timber later.
Picking your target size
The "perfect" timber needs a size. Framers describe it as working some amount under nominal. The most common choice is 1/2" under, so an 8×8 is laid out as 7-1/2"×7-1/2". Some shops use 3/4" or even 1" under, especially with less consistent stock or hand-hewn timber.
How to choose for your project:
- Measure everything first. Take width and depth at both ends and the middle of every timber, and write it on the end grain or in a notebook.
- Find the smallest dimension of each nominal size across the whole load.
- Set your target a bit below that smallest number, typically at least 1/8" under, so that every housing actually cuts wood. A housing that's supposed to be 1/16" deep on a skinny timber is nearly impossible to cut cleanly.
- Round to a convenient number. 1/2" or 3/4" increments keep the arithmetic simple and line up with the 1-1/2" and 2" widths of a framing square's tongue and blade.
- Use the same reduction for every member of a given size throughout the frame.
| Nominal | Target at 1/2" under | Target at 3/4" under |
|---|---|---|
| 6×6 | 5-1/2" × 5-1/2" | 5-1/4" × 5-1/4" |
| 6×8 | 5-1/2" × 7-1/2" | 5-1/4" × 7-1/4" |
| 8×8 | 7-1/2" × 7-1/2" | 7-1/4" × 7-1/4" |
| 8×10 | 7-1/2" × 9-1/2" | 7-1/4" × 9-1/4" |
| 8×12 | 7-1/2" × 11-1/2" | 7-1/4" × 11-1/4" |
| 10×10 | 9-1/2" × 9-1/2" | 9-1/4" × 9-1/4" |
Don't skip this:
The target size is also the size your engineer should check. At every housing, the timber really is the reduced size, and that's where bearing, shear, and tenon stresses concentrate. If your frame is engineered, make sure the calculations use the reduced dimensions, not the full rough size.
Housings: how the perfect timber shows up at every joint
Here's the question square rule has to answer: if you measure everything from reference faces, what happens on the other side of the timber, where the size varies? The answer is the housing (also called a reduction or, on beam ends, a "gain").
A housing is a shallow, flat-bottomed pocket or step cut parallel to the reference face, at exactly the target distance from it. Cutting it removes the extra wood and exposes the face of the perfect inner timber right where the joint needs it. Housings do two jobs at once:
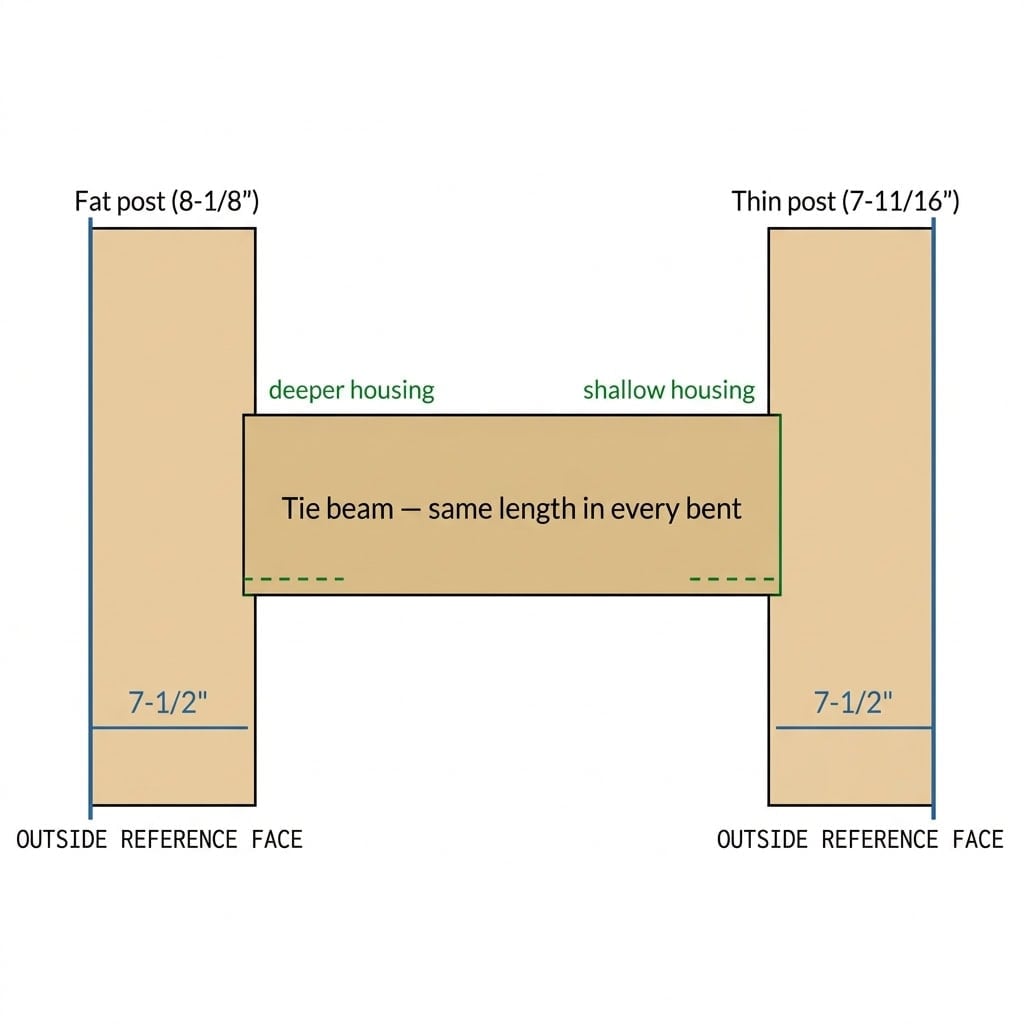
- They make common members truly common. If every tie-beam housing sits exactly 7-1/2" from the outside face of its post, then every tie beam can be cut to the same shoulder-to-shoulder length, no matter how fat or thin the individual posts are.
- They carry load. A housed joint lets the full width of the incoming timber bear on solid wood instead of hanging entirely on the tenon and pegs. (See Fully Housed Mortise and Tenon Joints for how much that matters.)
Because the housing is measured from the reference, its depth varies from timber to timber. On a fat post it might be 3/4" deep; on a thin one, 1/4". That's correct and expected. Never measure housing depth from the rough face you're cutting into.
Reduce both sides of the joint
The incoming member varies too. A rough 8×10 tie beam might be 9-7/8" deep at one end and 10-1/4" at the other. So you also reduce the end of the tie beam, measured from its reference (the top), down to 9-1/2". Now the beam end is a known size, so every mortise and every housing in every post can be identical.

Carry that reduction a little past the point where the beam enters the post. If it stops exactly at the shoulder, a fat spot just beyond it can collide with the irregular inside face of the post during assembly. An extra inch or so of reduction past the shoulder avoids the problem.
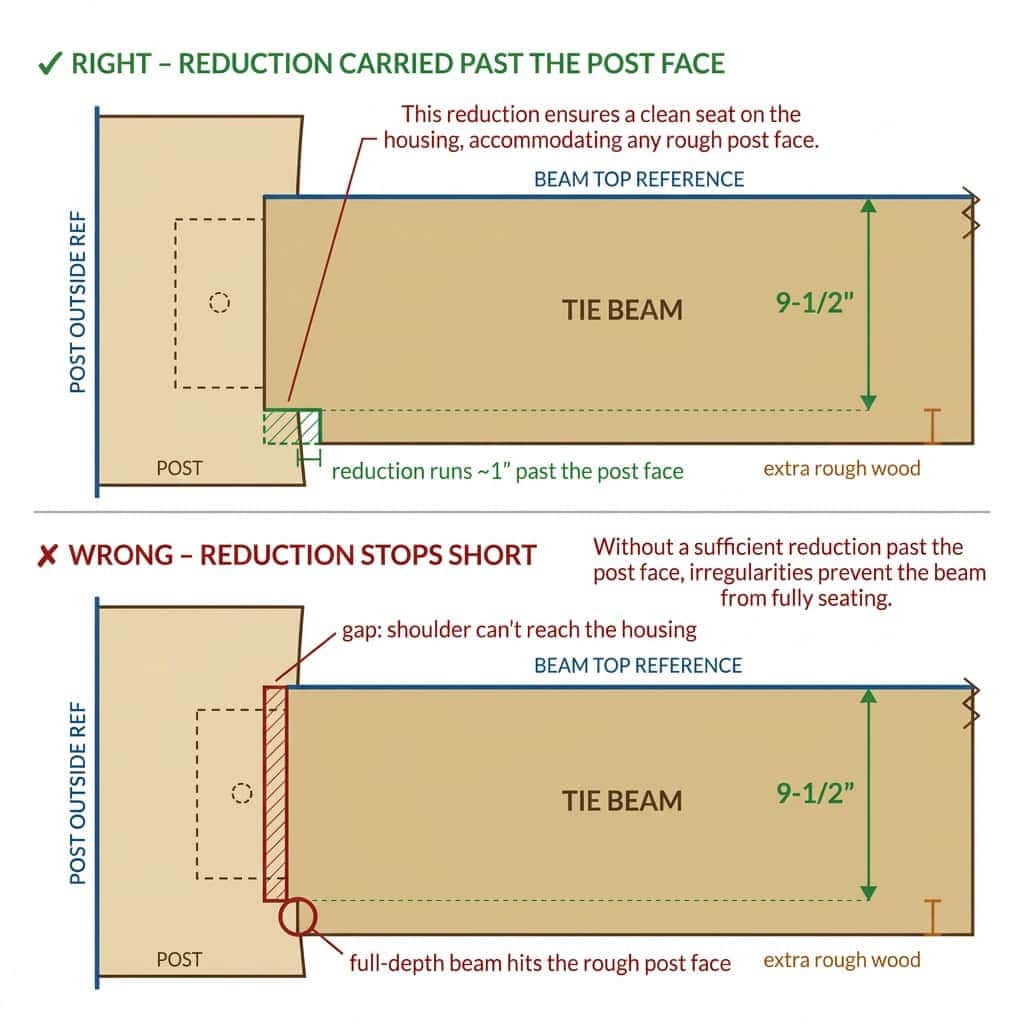
Side view of a tie-beam end entering a post. The housing depth (and the extra wood under the beam) is exaggerated so it's easy to see. If the reduction stops before the rough post face, the full-depth part of the beam hits the post before the shoulder can seat.
Worked example: a bent with four posts that don't match
Let's say you're building a 16'-wide shed frame (16'-0" outside to outside) with three bents. You measured your six 8×8 posts and four of them look like this at the tie-beam height:
| Post | Measured (across the bent) | Target | Housing depth on inside face |
|---|---|---|---|
| 1A | 8-1/8" | 7-1/2" | 5/8" |
| 1B | 7-15/16" | 7-1/2" | 7/16" |
| 2A | 7-11/16" | 7-1/2" | 3/16" |
| 2B | 8-1/4" | 7-1/2" | 3/4" |
The smallest post is 7-11/16", so a 7-1/2" target (1/2" under nominal) works: every housing removes at least a little wood.
Tie-beam length. Outside to outside is 192". Each post contributes 7-1/2" to the overall width at the joint, so the tie beam's shoulder-to-shoulder length is 192" − (2 × 7-1/2") = 177". Add the tenon length at each end (say 4") for a cut length of 185". Every tie beam in the frame gets the same numbers, even though no two posts are the same size.
Tie-beam ends. Each tie beam is reduced at both ends to 9-1/2" deep (from the top reference) and 7-1/2" wide (from its side reference). The mortises and housings in all six posts can then be laid out identically from the posts' reference faces.
Elevation. Heights work the same way. Measure post heights and tie-beam positions from a single datum, usually the bottom of the post (or the top of the sill) and the top of the plate, not from wherever the rough end happens to be.
The mental model
Every measurement starts at a reference face or a datum. Every joint is cut to the target size. The rough wood in between is just along for the ride.
Knee braces in square rule
Braces are where square rule really pays off, because a frame might have dozens of them and you want every one to be interchangeable.
- Lay out the brace "run" from the references. A 36" run means the brace's working points sit 36" down the post and 36" along the beam, measured from the reference faces of the joint (typically the outside of the post and the top of the beam, or the inside of the reduced/target timber, depending on your plans). Be consistent.
- House the brace shoulders. A shallow housing, commonly 1/2", gives the brace shoulder a flat, known seat regardless of how rough the inside faces of the post and beam are. Measure the housing depth from the reference, not the rough face.
- Get the length from the framing square. The brace table on the back of a traditional framing square gives the diagonal for common runs. For a 45° brace, the diagonal is the run × 1.414 (a 36" run gives about 50-15/16"). Remember to account for the housing: the brace's working line is set in from the housed shoulder, not the rough face.
- Reduce the brace stock too. Braces are rough sawn as well. Pick a reference face and edge on each brace and reduce the tenon area to the target thickness.
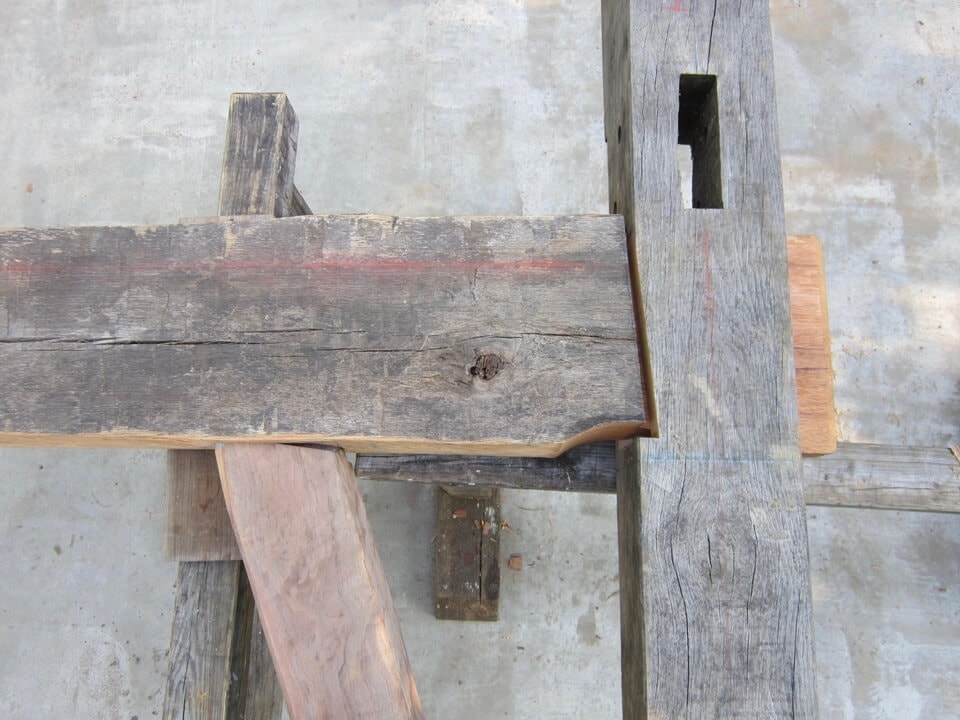
For a detailed look at fitting a housed brace, including chalking shoulders and paring the housings, see Fitting Up a Knee Brace.
Bowed, twisted, and crowned timbers
The face-referenced square rule assumes that the reference faces are reasonably straight. When a timber has real bow or twist, measuring off the face will carry that curve into your joinery. Two fixes:
Snap-line (or centerline) square rule
Instead of trusting the face, snap a straight chalk line down the timber a fixed distance in from the reference corner (or down the centerline), and take all measurements from that line. The line is straight even when the face isn't, so your joints stay in a true plane. Many experienced framers use snap lines on every timber over about 16' long as a matter of habit.
Spot-planing at joints
Where a reference face has a hollow or high spot right at a joint, plane or slick a small flat at that location, sighting from end to end, so your square has a true surface to register against.
Crown up
Sight every horizontal member before you assign it a location and mark the crown (the high side of any bow). Spanning members such as girts, tie beams, and plates go in crown-up, so the load tends to straighten them rather than increase the sag. Mark the crown with a caret at mid-length as soon as the timber is on the horses.
When timbers are truly wild (hewn logs, round-wood, salvaged stock with heavy bow), square rule starts to fight you, and scribing or a scribe/square hybrid is the better tool. Our layout rules overview covers when to switch.
Green timber: what changes after you cut
Most rough-sawn framing timber is green, meaning above about 19% moisture content. That's normal and well within the craft tradition, but it affects layout in a few ways. (Our article on green vs. dried timbers goes deeper.)
- Timbers keep shrinking after you cut them. Green Douglas fir timber dried all the way to 8% can shrink by nearly 5% across the grain. In a real building, it will typically lose a percent or two in each direction as it reaches equilibrium. On an 8" post, that's roughly 1/8" to 3/16". Housings help here: the bearing surfaces stay flat even as the timber gets smaller.
- Cut joinery at a consistent moisture. Don't let half the load bake in the sun while the rest sits under cover. Uneven drying leads to uneven shrinkage among timbers you measured on the same day. Stack timbers on stickers, out of direct sun and rain, and cut them in a reasonable timeframe.
- Draw-bore your pegs. Offsetting the peg hole slightly in the tenon pulls the shoulder tight now and helps keep it tight as the timber shrinks.
- Expect checking. Boxed-heart timbers almost always develop a check running toward the pith as they dry. It's generally cosmetic. Where possible, orient the likely check face toward a non-critical side and away from the peg holes. Free-of-heart-center (FOHC) timbers are checked less but cost more because they require a larger log.
- Give it a season. A frame raised in fall and enclosed but not heated hard through its first winter dries more gently and checks less than one closed up and heated right away.
Grading, engineering, and the building inspector
Before you buy a load of rough timber for a permitted building, check what your jurisdiction will accept. Under the International Building Code, sawn lumber carrying structural load is expected to bear a grade mark from an accredited grading agency. For rough sawn lumber and timbers over 3" nominal, the code also allows a certificate of inspection from a grading agency in place of a stamp.
In practice, that leaves you several paths:
- Buy graded timber. Many timber suppliers can provide grade-stamped or certified rough timbers. Ask before you order.
- Have local timber graded. Regional grading agencies can send a certified grader to inspect and stamp or certify timbers from a local or portable mill, for a fee.
- Use a local exemption. Some states and provinces allow ungraded lumber for owner-occupied homes milled from the owner's land, or for farm buildings, with conditions. These vary widely.
- Get an engineer involved. An engineer's stamp on a timber frame design often carries weight with inspectors, and many jurisdictions require one for timber frames anyway. Give the engineer your species, grade, moisture condition, and your reduced (target) sizes at the joints.
The single best move is to call your building department before the timber is sawn. Most inspectors want to work with you; they just need a documented basis for approving the material.
A shop workflow, start to finish
- Stack and sticker the timbers on a level base, under cover, as soon as they arrive.
- Measure and record every timber: width and depth at both ends and the middle, plus overall length.
- Set target sizes for each nominal size based on the smallest measurements.
- Assign timbers to locations. Best and straightest stock to the most visible and most critical positions; crowns noted; ugly faces turned inward.
- Write the reference-face schedule and mark reference faces and IDs on every timber.
- Snap lines on long or bowed timbers if you're using snap-line square rule.
- Lay out every joint from references and datums only. Have a second person check layout before cutting. A fresh set of eyes catches most errors.
- Cut housings and reductions first, then mortises and tenons. Check housing bottoms with a square registered on the reference face.
- Test-fit critical joints where you can, especially the first bent, before cutting the rest.
- Bore pegs, label, and stage the timbers in raising order.
Tools that make this go smoothly: a good framing square (check that the tongue really is 1-1/2" and the blade 2"), a combination square, chalk line, lumber crayon, sharp framing chisels and a slick, a power planer for spot-flattening, and a circular saw with enough depth for the housings. Our timber framing tools page has more.
Common mistakes
- Measuring from the wrong face. One layout line pulled from a non-reference face can throw off a whole joint. If in doubt, find the triangles.
- Measuring housing depth instead of housing position. The depth is whatever it needs to be. The position from the reference is what's fixed.
- Choosing a target size that's too big. If one timber is smaller than your target, there's nothing to cut and the joint won't come out right.
- Stopping a reduction right at the shoulder, leaving the beam to bind on the irregular post face during assembly.
- Inconsistent references across a wall. If Post A is referenced to the outside and Post B to the inside, your plate won't sit on a common plane.
- Forgetting crowns. A tie beam installed crown down will show it.
- Leaving grading until the end. Finding out after the frame is cut that the inspector wants a grade certificate is an expensive surprise.
FAQ
Is rough sawn timber strong enough for a timber frame?
Yes. Rough sawn timbers are usually full-sized, so they often have more cross-section than surfaced timbers of the same nominal size. Strength depends on species and grade, and for a permitted building it should be confirmed by grading and, where required, engineering using the reduced sizes at the joints.
How much smaller than nominal should I lay out?
1/2" under nominal is the most common starting point. Measure your load first and pick a target that sits safely below your smallest timber; with less consistent stock, 3/4" or 1" under is reasonable.
Can I use mill rule on rough sawn timber?
Only if the timbers are unusually consistent and square. With typical rough stock, measuring straight off the faces will produce tie beams and braces that don't match from bent to bent. Square rule exists to solve exactly that problem.
Do I need to plane rough sawn timbers?
No. Many frames are left rough for appearance and cost. You may still plane or slick small areas at joints, or plane exposed faces after the joinery is cut for a smoother finish. If you plan to plane every face after joinery, make sure housings are deep enough that the joints still close tight. Rough timbers also take more finish; see Timber Frame Finishes Simplified.
What's the difference between square rule and snap-line rule?
They're the same idea with a different reference. Face-referenced square rule measures off the timber's faces. Snap-line square rule measures off a straight chalk line, which handles bowed or twisted timbers better.
Which wood species work well rough sawn?
Douglas fir, white oak, and eastern white pine are all excellent framing species and are widely available rough sawn in suitable sizes. Our guide to choosing a timber species compares them.
Ready to put this to work?
Our timber frame plans give you complete joinery drawings to lay out and cut your own frame. And if you'd rather spend your time raising instead of laying out, our Ready-to-Raise™ kits arrive CNC-machined with the joinery already cut.