“Each stick was carefully mortised or tenoned by its stump, for I had
borrowed other tools by this time.” Henry David Thoreau, Walden
Timber frame layout is pretty simple, in concept. Just put the marks in the right places, then cut to the marks … maybe a bit intimidating when faced with a bundle of timbers for the first time without someone else to take the lead. We’ve all been there…
Assuming that you have some sturdy horses, the first tools you’ll need are metal snips for cutting strapping, a tape measure, and a lumber crayon. Handling heavy timbers is an art form, somewhere between ballet and Sumo wrestling. Working with levers, rollers, straps … never lifting more than half the weight of a timber will ultimately save your back (and fingers) for another day. Having another person who can just push down with their weight on one end of a timber as a counterbalance, you can handle several hundred pounds without lifting more than a fraction of the weight.
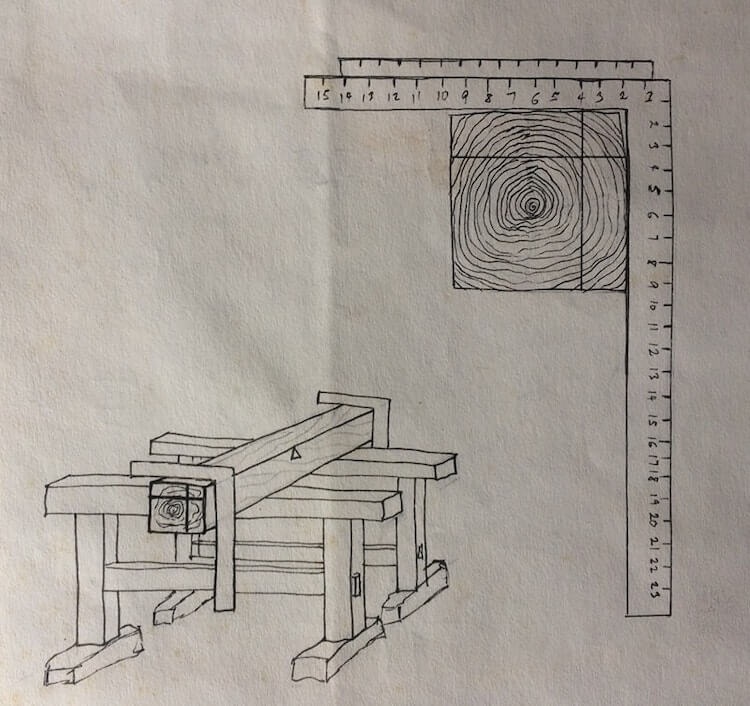
I like to start by fishing a timber out of the middle, lifting one end until a piece of dunnage can be slipped under to effect a fulcrum, then pushing that end down to ease the lift on the other end. With the timber supported on two sticks, you can begin layout. First, sight along the length to locate the crown, and mark a triangle (caret) at the mid-length on that corner (arris). Until you have decided on the stick’s location in the finished frame, stop there. Transfer it to the horses, and bring the next stick up. At this point, be liberal with the lumber crayon, marking pieces for where you think they might go in the frame.
MILL RULE
If your experience up to this point has been stick framing, and your timbers have been processed through a timber sizer, the obvious choice for timber frame layout is Mill Rule, which more or less follows the familiar methods of carpentry layout. Mill Rule assumes an external geometry: the timber faces that are reasonably square to one another … width and thickness even along the length. Reference a framing square on the edge of the timber … mark along the tongue for cross-cuts or to locate mortices … lay out mortices and tenons parallel to the outer face.
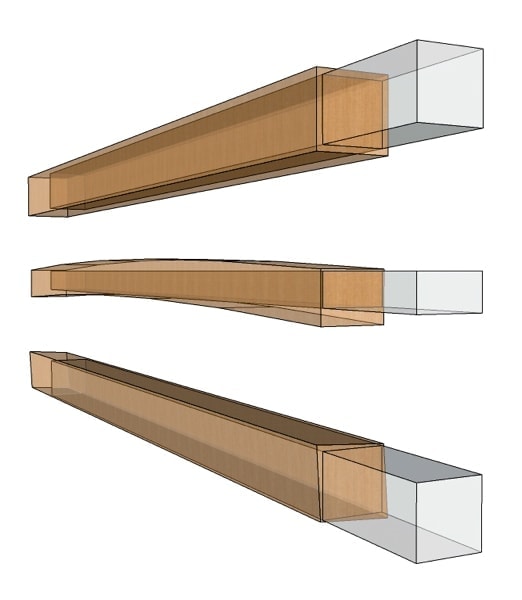
All good … until you come across a timber that doesn’t behave according to the rules. Wood moves, timbers bow and twist, revealing stresses that were grown into the tree. A green timber, fresh off the mill, might be absolutely straight and square. Give it a month or so, and you will likely see it change shape. Even after drying and planing, timbers will often continue to twist.
SQUARE RULE
“Each stick was carefully mortised or tenoned by its stump …” A timber framer will see at once that Thoreau was working with Square Rule. Not surprising, considering his aptitude for trigonometry. Square Rule differs from Mill Rule in that it assumes the timber is not geometrically perfect. Housings, cut parallel to layout lines, reduce the rough oversize timber to a nominal dimension at the mortise location. Beam ends are reduced on their underside to nominal dimension. Braces are cut to a length determined by the Brace Table on the Framing Square, with their shoulders fitted into housings.
FRENCH SCRIBE
Plumb-line Scribe, or French Scribe begins with setting out a full-sized plan of the building section on a floor, or on blocks embedded in the ground. Strings or chalked lines connect points, defining the outer parameters of the establishment (from the French, corrupted into “bent” in English usage). Timbers are supported by cribbing, aligned with the plan using a plumb-line, vertical distances are transferred with dividers. Several layers can be set up and marked at one time, but one must be careful that every joint has been properly marked before dismantling the establishment.
The differences between these three layout methods reflect advances in processing timber more than anything else. Unless your work demands historical accuracy, they are not mutually exclusive. Layered scribing is analog, Square Rule and Mill Rule are more abstract, and require a bit of three-dimensional visualization. Medieval and Renaissance builders often created accurately scaled models and lifted dimensions directly from the model. A 1:12 scale model, for instance, would require 12 compass steps on the actual timber.
In the pre-industrial world, hand-hewn timbers could vary significantly in dimension and still be tightly fitted into a framework with simple tools. Square rule could make use of hand-hewn timbers (Thoreau’s cabin) or the out-of-square, tapering timbers coming from circular saw mills. Square Rule typically employs parallel reductions, Scribe Rule likes diminished housings. Fitting up posts and a beam into an H-bent, then lofting in curved braces with a plumb-line might be worth a try.
LINING OUT
“… for I had borrowed other tools by this time. “The Steel Square developed alongside Square Rule, in the second quarter of the 19th century. The old ones are about 1/4″ thick at the corner, tapering to barely 1/16″ at the ends. Most had a 2″ blade 24″ long, and an 18″ tongue, 1 1/2″ wide, with a table of brace lengths on one face. These established the standards for joinery and matched the width of chisels. One is good, two is better … an old square cut off to 16″ x 10” is handy. So is a tenon gauge made from two small squares held together with stair or rafter gauges.
“Taking out the wind” … sighting the squares into parallel, by using shims (pennies work well) or shaving off wood, marking all four faces for center lines at each end, then connecting those marks with a line. A combination square facilitates marking offsets from the square to the timber faces. I use a spare combination square blade for a lot of layout tasks.
CHALK LINE or INK LINE
… each has its points, good and bad. Blue chalk fades and washes away, red chalk is permanent. Ink lines can be messy until you get used to them. Marking out … a carpenter pencil sharpened to a chisel edge with a block plane works well on dry wood, an ink pencil or pen may be more visible on wet or weathered wood. Traditionally, a sharp awl was used for marking out joints. Effective, precise, and very permanent.
CHECKING LAYOUT
All the shops I have worked in used some sort of double-blind technique to check layout. One person performing the initial layout, another checking. Fine, if you have two people who are confident and competent with the same layout method. Story Poles are helpful, particularly for repetitive post measurements. “Burning an inch” can easily lead to cutting a piece of timber an inch short … better to “burn” 10 inches, convert your length to inches (architectural practice puts all dimensions in feet and inches) and add that 10 inches to your measurement. It makes sense when you do it, and the hook is well out of the way.
As you work, look for waney edges or corners that have been crushed by strapping. Can those be removed or softened with a chamfer? Knots or other flaws can be located on an outside face, discreetly filled with a dutchman, or perhaps inspire a carving.
At one time blueprints were blue with white lines, then white with blue lines, now they’re printed on a plotter from a digital file. Or they’re sheets at whatever size you’re printer is capable of running, and you should forget about using a scale stick to lift dimensions. Remember that architectural practice is feet and inches … 2 feet 8 inches is not the same as 28 inches. For work in the field, a piece of 1/4″ plywood painted white makes a good drawing board, and doesn’t blow around or dissolve in the rain. It takes about three times as long to fix a mistake … better to get it right the first time. Check layout!
which method is illustrated in the figure?
I believe it’s ‘taking out the wind’. May be wrong.
Excellent article. Very interesting. As a new woodworker, it’s mentally confusing when figuring out these methods on one’s own; it’s nice to put names and some wisdom with them. Thank you.
Square Rule. The principle of two lines, representing two parallel planes, perpendicular to one another is fundamental to all layout. You might find the recent Timber Framing article on early framing squares helpful. M