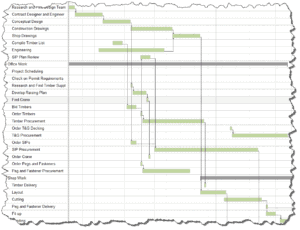
Making a construction schedule for your construction project takes time. However, I think you’ll find that you will reap the rewards in both time and money in the long run, by taking some time and making an accurate schedule. We talked in a previous article on the site about the benefits of making a schedule. While it’s easy to talk about the benefits of a construction schedule, it’s not as easy to create one. So, I thought I would devote a little time both writing and making a video showing you how I make a schedule step by step. Let’s get to it…
Step One – Gathering information and getting the right tools
- Make a list of all the subcontractors. Contact them to get both a)how much time it will take to procure the materials they need; and, b) the amount of time that they expect your project will take once the materials are on site. For example, it may take upwards of 6 to 8 weeks to get windows and doors delivered to your site. After they are ordered, add to that selecting and working through the various options of the windows and it may take you an additional 2 to 3 weeks. This lets you know that you have an effective time of about eight to eleven weeks to get the windows on site.
- Contact your local code office and find out the different requirements and inspections for your area. Remember timber frame construction is a bit different and I would recommend you go and check out my previous article about working with your local code office before you contact them.
- Sit down and talk through your project with your bank and figure out when they will release their draws. Cash is king when it comes to keeping your project rolling and every bank is a little different when it comes to when they will disburse money. Sit down with them both before and after you make the schedule. This will give you and the bank the big picture about when you will need money. Often times you will need to make adjustments to your schedule after getting their draw schedule.
- Select the best template for your project from the options below or create one from scratch to meet your project parameters.
- There are several online tools as well as offline tools that you can run on your computer to make the schedules and Gantt Charts. I use and recommend Smart Sheet or Project Manager because it’s easy to use and you can share it online with everyone in your team and it has a free 30 trial. You can also get a free trial of Microsoft Project, or even use an Excel sheet if you are familiar with the Gantt chart formulas as an option.
- Select the best template below for your project from the options below or create one from scratch to meet your project parameters.
Timber Frame House Construction Schedule
Timber Frame Addition Construction Schedule
Timber Frame and SIP Project Construction Schedule
Step Two – Get rolling – Watch the Video
- Create a free Smart Sheet account.
- Download one of the above templates.
- Import the template into Smart Sheet
- That’s it! You are ready to get started, but, remember…
Step Three – Be realistic
- Rain/snow and bad weather days add up. In our area if we can have a five day work week I am happy; but, I have to realize that later down the road we may only be able to get a three day work week because of the weather. It’s that cushion that will make your schedule a little more accurate. You can easily check a chart of the rain days in your area and then sort out how much time you need to factor into your schedule by multiplying the number of days of rain on the chart by 60% (due to weekends not being counted) then take that number and divide by 52 (weeks). That will give you an average of days per week for your area.
- Remember the holiday seasons and other holidays throughout the year. They will impact your schedule. There may be other factors out there like hunting seasons and harvesting that you may want to consider.
- While I like to trust that the estimates that a subcontractor or supplier gives me are dead on, I generally add 25% to 30% to their time just to be safe. Remember the goal is to be reasonable in determining the deadlines, as Eric Morley just mentioned in Timber Frame Talk Radio Episode 4 – the average individual underestimates the time it takes to complete a task by 30%. Be cautious and realistic, it will pay off in the long run.
- While everyone certainly strives to pass a code inspection on the first go-round, it is often like going to the DMV and many times takes two times to get everything squared away and get rolling again. Make sure you take this into account and give yourself a couple of days of cushion on either side of the inspections as these tend to be big hinge points in a project.
- It is easy to make the schedule what you want instead of what it is. If you need to be in before Christmas and you start shuffling things around unrealistically, stop and really think… is that possible? I remember looking at my wife in tears and telling her that I was not able to follow through on the schedule that I committed to. That experience hurt, and I learned a valuable lesson that I have applied to all my schedules since then. Remember to be real and honest with yourself and your clients.
Step Four – Start Your Schedule
- Start with setting the start date for the various tasks and adjust the schedule end date by adjusting the Gantt bar. Insert your specific project tasks that are not in the templates and deadlines from the information you gathered from step one.
- Add procurement, delivery, and other lead times that you have gathered from other sources. Knowing when to order something is just as important as knowing when it needs to be installed.
- Add building inspections and cushion their timeframe a little.
- Insert the bank draws and link them with the different tasks necessary to get the different draws from the bank. For example, in a timber frame home, it is generally necessary to give the timber frame company a deposit to get them to order the timber and start cutting. This need is actually a little unusual in the construction loans arena, so making sure the bank knows what is coming by sharing the schedule with them will help you in keeping your project rolling.
- Link those tasks that are dependent upon each other. This will both show you how things are tied together; and, if you have to adjust the schedule in the future, things will move together and you will not have to change each individual task.
- Assign tasks to people and color code different tasks. This will make it easier to see what you are doing and what other folks are doing. If this is integrated with SmartSheet, then it will send a reminder email to your team automatically about their upcoming tasks.
Step Five – Adjust, adjust and adjust it again

- Check and update the schedule often throughout the project. It is a living document that will change constantly. Remembering that the construction schedule will change depending on onsite and offsite scenarios will be paramount to your success in managing the schedule.
- While I look at my schedules often, I generally only update them twice a month. In the beginning, I updated them daily; but, I found that it was not a valuable use of my time and don’t recommend it. Now I try to sit back and look at the big picture for a week or so.
While I know (from experience) that making a complete and detailed construction schedule takes some time, I can assure you that both the time you put into it, and the money that you will save by making one, will be clear at the end of the project. It will simply keep your project rolling instead of having unnecessary delays. It will not be perfect. There are just too many factors involved for it to be 100% correct, but being able to see the big picture and what is coming helps you to be prepared and be able to tackle it before it hits you.

Sir,
The smartsheet link above gives a 404 Not Found error (broken link). Thought you’d like to know.
Great site, please keep up the good work.
Thanks I will look into it.
Brice
Bruce,
Very nicely put together article and well thought out, keep them coming…
Thanks a bunch Doug. More on the way.
Brice
Thanks Bruce for the great site and tips! Interestingly my wife and I both came onto smartsheet at the same time from different sites … we’re now playing with it and so far it seems like the real McCoy … btw I discovered it while researching software templates for timber frame templates for MS Project so a double hit with your template and smartsheet. One question, which I’ll bet you get asked a lot, is do you know of any templates that have most of the bits and bobs such as nails, screws and whatever else one can use in a self-build?
Thanks again & best wishes
Chuck
Chuck,
Thanks for the comment. I use Smartsheet almost daily in my businesses. I don’t know of a current template that has all the bit and pieces to build a home…I am am working on one to get out there.
Cheers,
Brice
Very nice informational site.
Thanks Richard!
Brice
Thanks. ..I’m glad for the information send…looking to learn as much as I can on Timberframing. ..hoping to enroll in a timberframe program in B.C. Time to expand my skills as a carpenter.
Thanks for the comment, I find it is always a good time to expand my skills.