“What tools do you use as a timber framer?”
So I’ve kind of broken them up into four different sections. The first one is chisels. The second one is going to be planes. Then we’re going to talk about measuring and marking tools. And then there are some other tools that are mixed in here that are just simply indispensable, that you have to have.

![]() Getting into the chisels, the first one that I grab, and it’s my go-to chisel, is my inch and a half chisel. I think if you are going to only have one chisel, this is the one for you. The one I grab first is the Barr chisel. It’s made in Idaho. It’s really high quality, and it’s fun to use and feels good in your hand. If you would rather have a little bigger one check out the 2″ framing chisel from Barr on Amazon here.
Getting into the chisels, the first one that I grab, and it’s my go-to chisel, is my inch and a half chisel. I think if you are going to only have one chisel, this is the one for you. The one I grab first is the Barr chisel. It’s made in Idaho. It’s really high quality, and it’s fun to use and feels good in your hand. If you would rather have a little bigger one check out the 2″ framing chisel from Barr on Amazon here.
The next chisel that I have is the three-quarters inch. Now, some people use a one-inch chisel, but I bought a used one at a shop up in Maine that happened to be three-quarters, and I love it. It’s really good for getting into those tight spots that the bigger chisels can’t get into. The third one in my toolbox is my corner chisel. This one’s good for taking out the corners on a housing or mortise. They’re difficult to sharpen, but they do make quick things of it.
![]()
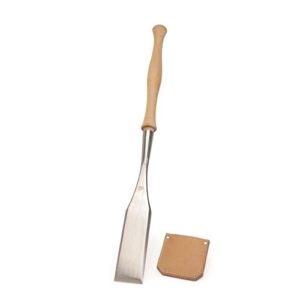
The next one it’s not really a chisel, it’s called a slick, and they’re good for paring down tenons, or smoothing out timbers before you lay them out or something, something where you have to take a lot of material off really fast. It’s a rough tool that you can just remove a lot of material fast. This one is two and a half inches thick. This one is also Barr but you can pick these up used really easily. So those are the four chisels that I have. Occasionally, I have a two-inch chisel, but I don’t use it as much as that inch and a half.
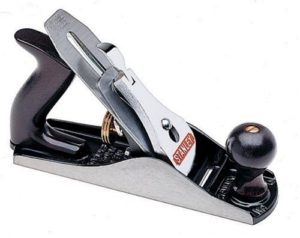
So going into the hand planes that I have, the one is a Stanley Number 3 bench plane. They’re very common. I bought this one for $12.00 used. I had to buy a new blade and a turn a new knob, but it’s worked great.
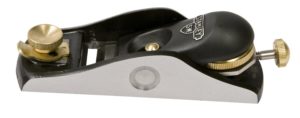
The next and last plane that I keep in my everyday toolbox is my low-angle block plane. Update: I used to use a Vertias but have switched to this Stanley/Bailey Block Plane. It’s a little heavier than the Vertis , but as long as you keep them sharp, they’re just so much fun to work with.

So getting into the measuring and marking tools, the first thing I want to talk about is the pencils. Usually, I like to use the Dixon Hard Lead Carpenter Pencils They produce a nice, fine line that’s very nice to use to get accurate joints. The other thing I have is a nice, big marker for marking up timbers. Then, of course, I always have a razor knife to sharpen those pencils, or to score the lines before I cut them.

![]()
I have a Shinwa bevel gauge. This one’s for transferring angles from one timber to another timber, or from a timber to a saw. I have your standard tape measure. I always tend to gravitate towards the 25-foot one. It just feels really good in my hand. I have a chalk box that’s good for making long, straight lines. I do recommend upgrading the string from the Stanley, if you have it, you can upgrade it, and it really makes a nice, fine line.
![]()
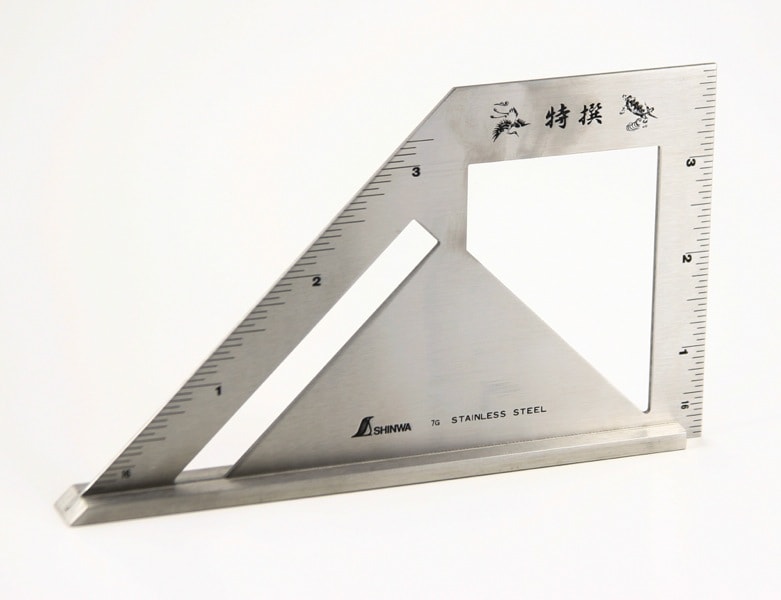
I have this little square, the Shinwa Japanese Combination Square. It’s really good for truing up a saw, both on the 45 and the 90 degrees. I have a combination square, and I think if you’re going to – this is one of the basic tools that you must have. It’s good for measuring depths of mortises, or housings, or making sure that you’ve got everything back-cut appropriately, and it’s also just a great ruler.
Then I have a longer, 16-inch ruler that came off an old combination square that I had that broke on a raising, and this one has actually turned out to be indispensable. It’s a 16-inch tape or ruler. I have two framing squares.
One is the standard, 24-inch one that you can find at most hardware stores. I did buy a stainless steel one that has black numbers on it, which really makes it a lot easier to read. The other one that I have is a small, 12-inch one that I’ve been made fun of a lot, just because of it’s size, but there are sometimes when that 24-inch one is kind of cumbersome, and this one is a great one just to grab.
The last square that I have is called a Bornemann Layout Template, and if you’re going to layout an entire timber frame, this is a great tool to have, or if you’re in a shop where everyone has one, they just make quick work of laying out timbers, because you can have a nice reference line and everything stays the same throughout your mortises and tenets.
So there’s a couple of other tools that I find indispensable. One of them is a Japanese saw. What happens is, this one actually has a crosscut and a ripped saw. This blade is replaceable. If you’ve never used a Japanese saw, I would highly recommend you grabbing one and trying it out. They’re just a dream to use.

![]()
The last weird kind of tool is my mallet. This is a Wood Is Good mallet. It’s a urethane-coated mallet with a weight in it. I used a handmade one for years, and I had to keep making them, and then when I found this one, I grabbed it, and I started to use it, and wow, it’s just really nice. It makes it more fun. It gives a little, if you will.
So those are the major tools. The last two tools I want to talk about are really just safety items that I highly encourage you to use all the time. One of them is hearing protection. Anytime I’m around power tools or anything loud, I put these one, and I think if you find if you start wearing them, and you take them off, and you’re listening to power tools, you’ll find that the whir of the motors is unbearable.
The last one, I always have safety glasses at hand. I have sunglasses and clear ones. Sometimes I have amber ones, just if the light is a little off, and I can’t stress enough that you wear eye protection at all times. You only have two eyes, and I certainly want to keep mine.
Please note:
Timber Frame HQ is a participant in the Amazon Services LLC Associates Program, an affiliate advertising program designed to provide a means for us to earn advertising fees by advertising and linking to amazon.com. When you purchase something within 24 hours from Amazon, a small percentage of the sale goes to support the efforts of TFHQ.
This was a great help. Thanks so much for providing the suggestions plus links on where to get them. Really appreciated!
Thanks Wade!
Hi There .
I am interested in a 1 inch chisel mortiser bit . Any leads on where to buy this? Very informative,
I will purchase the reccomended tools I do not have.
Great article. The Bournemouth layout template is extremely expensive in Canada. Do you have any suggestions where one can be purchased at a reasonable price? Thank you in advance
Seems the link for the shinwa square doesn’t come up.