Building a timber frame home is exhilarating. I don’t know about you but I’ve always dreamed of a home I built with my own hands. I want my dream made with timbers and a strong foundation so it will last forever. Since the strength of your home starts with the foundation, we will examine the 6 types of foundations for timber homes.
The foundation is the bones of any home. It holds everything together and keeps it from collapsing around you. You can also think of it as a boat sitting on top of the earth. Timber frame homes have a rich history and offer a unique blend of traditional craftsmanship and modern design. Before diving into the types of foundations, let's consider some important factors. We’ve broken down the different types of foundations for timber frame homes so you can choose the one that works best for you and your dream home.
What to Know Before Getting Started
Before you choose from the 6 types of foundations for timber homes , there are a couple of factors to consider.
- Soil Bearing Capacity: The soil’s ultimate bearing capacity is the max pressure the soil can handle before the supports collapse or sink. Allowable bearing capacity is the max bearing capacity divided by certain safety factors. This prevents any safety failures long before it can even collapse.
- Foundation Settlement: Foundation settlement is simply how your foundation settles into the soil. Settling is natural, but you don’t want your foundation to settle too far into the ground.
- Climate Factors: Think of the freeze-thaw cycles, especially if you live in a cold state. If you experience rapid temperature changes, your foundation will need special considerations.
- Cost: Different foundation types have different cost implications. Make sure to budget accordingly.
- Local Building Codes: Always check local building codes and regulations that might affect your choice of foundation.
- Professional Consultation: Consulting with engineers or architects can provide valuable insights into choosing the right foundation.
Know your soil, know your area, and know the different climate conditions your timber frame will experience before deciding which foundation to use.
1. Post and Pier

Post-to-pier construction is a technique commonly used to construct decks, porches, and elevated structures. This method connects vertical posts to concrete piers that serve as the foundation. The piers are usually set into the ground and may be poured in place or precast. They provide the necessary support and stability for the structure above.
Here's a simplified overview of the post-to-pier construction process:
- Site Preparation: The first step is to clear and level the area where the structure will be built. This may involve removing vegetation, rocks, and other debris.
- Layout and Marking: The locations for the piers are marked based on the design plans. It's crucial to ensure the layout is square and level for the structure to be stable.

3. Digging and Setting Piers: Holes are dug at the marked locations, usually using an auger. The depth and diameter of the holes depend on various factors like soil type, load-bearing requirements, and local building codes. Concrete piers are then set into these holes.
4. Pouring Concrete: Concrete is poured into the holes to form the piers. Metal brackets or post anchors are sometimes embedded into the concrete to provide a secure connection point for the posts.
5. Setting Posts: Vertical posts are attached once the concrete piers have cured. This can be done using various methods, such as bolts, brackets, or anchor base kits.
Advantages of Post-to-Pier Construction:
- Stability: The concrete piers provide a stable, durable foundation.
- Elevated Structure: Allows for building on sloped or uneven terrain.
- Ease of Construction: Generally simpler and faster than some other methods, such as full foundation construction.
Disadvantages:
- Limited Load-Bearing: May not be suitable for extremely heavy structures.
- Susceptible to Rot and Pests: Wooden posts can be vulnerable to rot and pests if not properly treated.
It's essential to consult local building codes and work with professionals to ensure that the structure is safe and durable.
2. Poured Walls
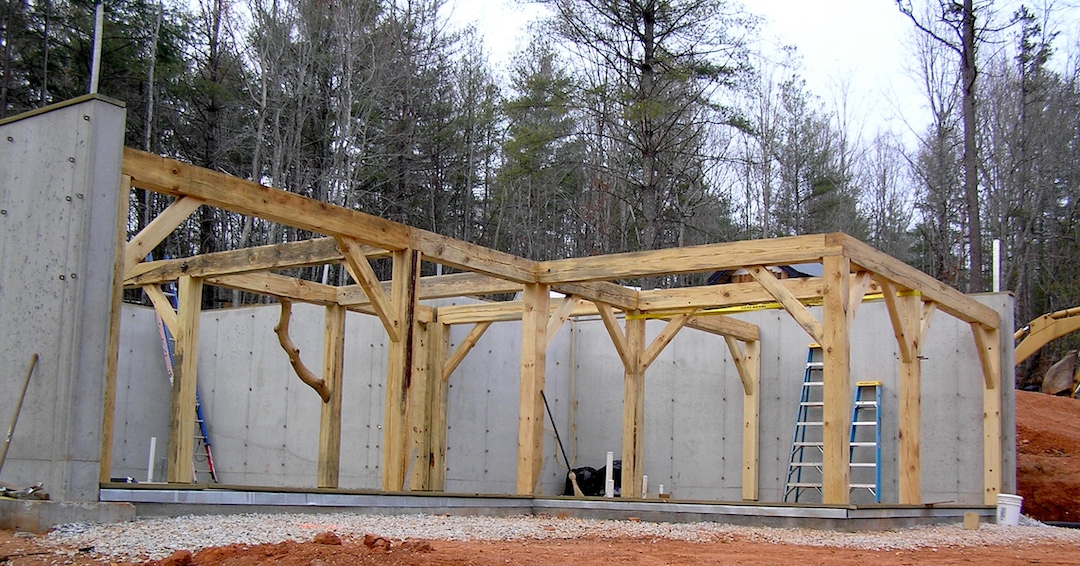
A poured wall foundation system is a type of foundation commonly used in residential and commercial construction. Unlike post-to-pier foundations, generally used for lighter structures like decks and porches, poured wall foundations are often used for more substantial buildings, including homes and commercial spaces. Here's an overview of the process and some of its advantages and disadvantages:
Process Overview:
- Site Preparation: The construction site is cleared of vegetation, rocks, and debris. The area is then leveled and excavated to the depth required for the foundation.
- Footings: Concrete footings are poured to provide a stable base for the foundation walls. The footings are usually reinforced with steel rebar for added strength.
- Formwork: Wooden or metal forms are erected to shape the foundation walls. These forms hold the concrete in place as it sets.
- Reinforcement: Steel rebar is placed within the formwork to reinforce the concrete walls. This makes the foundation more resistant to forces like tension and torsion.
- Pouring Concrete: Concrete is poured into the forms, filling them to the top. The concrete is then leveled and smoothed out.
- Curing: The concrete is allowed to cure or harden for a specified period. This is crucial for achieving the desired strength and durability.
- Form Removal: Once the concrete has cured, the forms are removed, revealing the poured concrete walls.
- Waterproofing: The exterior of the foundation walls is usually waterproofed to prevent moisture infiltration.
- Backfill: Soil is backfilled around the foundation walls, and construction of the building above can commence.
Advantages:
- Strength: Poured concrete walls are solid and durable, capable of withstanding high loads and pressures.
- Water Resistance: When properly waterproofed, poured concrete walls are highly resistant to water infiltration, making them suitable for areas with high water tables or prone to flooding.
- Design Flexibility: Poured concrete offers more architectural flexibility for various shapes and designs.
- Energy Efficiency: Poured concrete walls can offer better insulation and energy efficiency than other foundation systems.
Disadvantages:
- Cost: Poured concrete foundations can be more expensive than other types, such as block foundations, particularly in labor costs.
- Time-Consuming: Setting up forms, pouring, and curing can be time-consuming.
- Skilled Labor: Requires skilled labor for proper installation, especially for complex designs.
- Potential for Cracks: While strong, poured concrete is not entirely immune to cracking due to soil movement, temperature changes, or other factors.
As with any construction project, it's essential to consult local building codes and work with qualified professionals to ensure the foundation meets all safety and durability requirements.
3. Slabs

A poured slab foundation is popular for many residential construction projects, especially in warmer climates where the ground doesn't freeze. It's a straightforward, cost-effective foundation system for single-story homes, garages, and smaller structures. Here's a quick rundown of the process and some pros and cons to consider. Typically there is a thickened edge footing that is 12 to 18 inches thick and the slab is 4 to 6 inches thick .
How It's Done:
- Site Prep: First, you'll need to clear the lot of any trees, rocks, or debris. You want a nice, clean slate to start your project.
- Leveling and Grading: The ground is leveled and graded to ensure proper drainage. Nobody wants water pooling around their new home!
- Forming: Wooden forms are set up to outline the shape of the slab. These forms act like molds, holding the wet concrete until it sets.
- Plumbing and Electrical: Any underground plumbing or electrical lines that need to run through the slab are laid out before the concrete is poured.
- Reinforcement: A layer of gravel is spread out, followed by a grid of steel rebar or wire mesh. This gives your slab that extra oomph in terms of strength and durability.

6. Pouring the Concrete: Here comes the fun part! Concrete is poured into the forms, filling them up to create your slab. It's smoothed out with trowels to ensure the surface is nice and even.
7. Curing: Patience is key here. The concrete needs time to cure and harden. This usually takes at least a few days.
8. Form Removal and Final Touches: Once the concrete is set, the forms are removed, and any additional features like anchor bolts for walls can be added.
The Good Stuff:
- Cost-Effective: Slab foundations are generally less expensive than other types, like crawl spaces or basements. You'll save on both materials and labor.
- Quick to Install: Once the site is prepped, pouring a slab can be done quickly, especially if the weather's on your side.
- Low Maintenance: With no crawl space or basement, you don't have to worry about moisture issues underneath your home. It's a set-it-and-forget-it deal.
- Energy Efficient: Slabs provide excellent thermal contact, making heating and cooling your home more efficient.
Things to Consider:
- No Storage or Utility Space: What you see is what you get. There's no extra space for storage or utilities under your home.
- Plumbing and Electrical Access: Any pipes or wires running through the slab are hard to get to if you ever need to make repairs. Plan carefully!
- Cold Floors: In colder climates, slab floors can feel chilly underfoot. You should think about radiant floor heating.
- Ground Movement: Slabs can be susceptible to shifting or cracking if the ground underneath moves. Make sure your site is well-prepared and graded.
As always, make sure you're up to speed on local building codes and regulations, and it's always a good idea to consult with professionals to ensure your foundation is up to snuff.
4. Superior Walls

Superior Walls is a brand name synonymous with precast concrete foundation systems. These foundations are manufactured in a controlled environment and then transported to your construction site for quick and easy installation. If you're considering a Superior Walls foundation for your home, here's what you need to know.
Step-by-Step:
- Site Preparation: As with any foundation, you'll start by clearing and leveling the construction site. A gravel bed is usually prepared as a base for the Superior Walls panels.
- Panel Delivery: The precast panels are delivered to your site on trucks. These panels are custom-made according to your foundation's design and come with openings for doors and windows and built-in electrical and plumbing chases.

3. Installation: A crane lifts the panels into place on the prepared gravel bed. The panels are secured to each other using bolts and adhesive to form a continuous, robust wall system.
4. Sealing Joints: Once all the panels are in place, the joints between them are sealed to create a watertight foundation.
5. Proceed with Construction: You can start building on top of your Superior Walls foundation almost immediately, which is one of its significant advantages.
6. Backfilling: The soil is backfilled around the foundation after the panels are secured and sealed.
The Good Stuff:
- Speedy Installation: One of the biggest perks is how quickly a Superior Walls foundation can be installed—often in just a day.
- Energy Efficiency: The panels come with built-in insulation, providing good thermal performance immediately.
- Strength and Durability: These foundations are designed to resist issues like cracking and settling.
- Ready for Finishing: The interior surface is smooth and ready for drywall, saving you a step if you plan to finish your basement.
- Design Flexibility: Customization is a big plus. The panels are made to fit your specific design, including features like window and door openings.
Things to Consider:
- Cost: Superior Wall systems can be more expensive upfront than traditional foundation methods. However, the speed of installation and long-term benefits like energy efficiency can offset this.
- Site Access: You'll need enough space for the delivery trucks and cranes, which might be a challenge on some lots.
- Limited Availability: Superior Walls products are unavailable everywhere, so you'll need to check if they can be delivered to your area.
- Specialized Installation: While the installation is quick, it requires a crew trained in handling and installing these specific panels.
As always, ensure you comply with local building codes and consult professionals familiar with Superior Walls systems. If you're looking for a quick, energy-efficient, and durable foundation, this could be an excellent option for your home!
5. Concrete Block (CMU)

Concrete block foundations, often called cinder block foundations, are a classic choice for many homes. They're particularly popular for crawl spaces and basements. If you're considering going this route for your residential project, here's what you need to know.
Step-by-Step:
- Clear the Stage: First off, you'll need to clear your lot of any obstacles like trees, rocks, or old structures. A clean, level site is essential for a strong foundation.
- Footings First: Before those blocks go up, you'll pour a concrete footing to give them a solid base to sit on. This usually involves digging a trench and filling it with concrete, often reinforced with rebar for that extra strength.
- Laying the Blocks: Once the footing is set and level, it's time to start laying your concrete blocks. Mortar is applied between each block to hold them together. It's like building a giant Lego house but with mortar instead of plastic snaps.
- Reinforcement: As you build the walls, you'll typically add vertical and horizontal reinforcement. This can be rebar or sometimes filled cells with poured concrete, to make sure those walls are sturdy and stable.

5. Curing Time: Once the block walls are up, they'll need some time to cure. This helps the mortar reach its full strength and durability.
6. Waterproofing: Last but not least, you'll want to apply a waterproofing membrane to the exterior of the block walls to keep moisture at bay.
The Pros:
- Cost-Effective: Concrete blocks are generally less expensive than poured concrete, especially considering labor costs.
- DIY-Friendly: If you're a hands-on homeowner, laying block can be a DIY project, although it's a lot of work, and you'll need to be very precise.
- Versatile: Block foundations can be used for a slab-on-grade foundation for crawl spaces, full basements, or even stem walls.
- Insulation Options: Hollow blocks can be filled with insulation, making your foundation an energy-saving superstar.
The Cons:
- Moisture Concerns: Block foundations can be more susceptible to moisture issues if not correctly waterproofed. Nobody wants a damp basement!
- Strength: While strong, block foundations aren't as strong as poured concrete, especially against lateral forces. This might be a factor if you're in an area with seismic concerns.
- Time-Consuming: Laying a block is labor-intensive and can take longer than pouring a slab, especially if you do it yourself.
- Aesthetic Limitations: Blocks are functional but only sometimes the prettiest to look at. If aesthetics are a concern, consider additional finishes or cladding.
As always, ensure you comply with local building codes and consult professionals for the best results. Building a home is a big project, and the foundation is the foundation of it all! Make sure you get it right.
6. ICF (Insulated Concrete Forms)
")
Insulated Concrete Form (ICF) foundations are gaining traction in residential construction and for a good reason. They combine poured concrete's strength with foam blocks' insulation benefits. If you're considering an ICF foundation for your home, here's the lowdown.
Step-by-Step:
- Site Prep: As with any foundation, you'll start by clearing and leveling the site. This ensures a solid, stable base for your foundation.
- Setting Up the Forms: ICF systems use interlocking foam blocks (often made of expanded polystyrene) that act as the formwork for the concrete and the insulation for the foundation. You'll stack these blocks according to your foundation's design, much like a building with giant Lego bricks.
- Reinforcement: Steel rebar is placed vertically and horizontally within the ICF forms before pouring. This gives the poured concrete added strength and resistance against tension.
- Pouring the Concrete: With the forms and rebar in place, concrete is poured into the ICF blocks. The foam forms hold the concrete in place as it sets and cures.
- Curing: Like any concrete foundation, the concrete within the ICF blocks needs time to cure and reach its full strength.
- Proceed with Construction: Once the concrete has cured, construction of the walls or the floor system above can begin directly on the ICF foundation.

The Good Stuff:
- Energy Efficiency: Those foam blocks aren't just for show. They provide excellent insulation, which can significantly reduce heating and cooling costs for your home.
- Strength: The combination of concrete and rebar reinforcement makes ICF foundations incredibly strong and durable.
- Soundproofing: ICF foundations can provide better sound insulation than traditional foundations, giving you a quieter living space.
- Quick Installation: With the right crew, ICF foundations can be installed relatively quickly since the formwork and insulation are combined into one step.
- Resistant to Pests and Mold: The materials used in ICF systems are typically resistant to pests like termites and don't support mold growth.
Things to Consider:
- Cost: ICF foundations can be more expensive upfront than traditional foundation methods due to the cost of the forms. However, the energy savings over time can offset this.
- Specialized Labor: While the process is straightforward, having a crew experienced with ICF installation can be beneficial to ensure everything goes smoothly.
- Alterations and Modifications: Making changes or modifications to an ICF wall after it's been poured can be more challenging than with other types of foundations.
- Aesthetics: The exterior of ICF can be finished in various ways, but if left exposed, it may be less visually appealing to some.
As with any construction project, consult professionals familiar with ICF systems and adhere to local building codes. An ICF foundation can offer a solid, energy-efficient base for your dream home!
Conclusion
Choosing the right foundation system is a critical decision in home building, affecting both the construction phase and the long-term durability and comfort of your home. From traditional poured concrete and concrete block foundations to innovative options like Insulated Concrete Forms (ICF) and Superior Walls, each system has its own advantages and considerations. Precast options like Superior Walls offer a compelling solution for those looking for speed and energy efficiency. Concrete block foundations might be your go-to if you're building on a budget, while poured concrete remains a strong and versatile choice. For the eco-conscious homeowner, ICF provides a blend of energy efficiency and structural integrity that's hard to beat.
Ultimately, your timber frame's "best" foundation system will depend on various factors, including your budget, local building codes, soil conditions, and personal preferences. Consulting with construction professionals and engineers can provide valuable insights into the system most suits your specific needs.
Remember, the foundation is literally what your home is built upon. Making an informed choice in this crucial area is an investment in your home's long-term quality and comfort.
This conclusion effectively summarizes the key points and provides a comprehensive overview for anyone navigating the complexities of choosing a foundation system for their home.
love your theory of building
Thank you!
I’m stuck on what is probably a simple problem. I’m building a 9′ x 20′ sauna, with 6×6 timbers primarily.
I plan to build the entire base, the 4 sills, without any posts sticking out below it. I plan to connect that to simple concrete piers. Is there a proper way to do this? Everything seems to assume vertical posts onto piers, instead of the entire sill frame.
I could leave 1 rebar sticking out of each pier, then attach a small pressure treated base, then put the sill on top of that, so at least the rebar would secure it from sliding. I’m using white oak, and off the ground, so I’m not too stressed out about decay resistance.
Thanks!
Use a Simpson Strap that has been embedded into the concrete pier. You can have it on the inside of the floor system so you cannot see it from the outside.
Is there a detail that shows a Sill with post attached to a block foundation? I plan on using a 8×8 Sill on top of a pressure treated plate sitting on a block foundation with Posts tenoned and pegged to the sill. My Engineer wants me to find a detail that shows something like this. The SImpson strong tie detail only shows it using a slab.
The closest to that we have is this one
Very informative, thanks. Do you offer advice on helical screw piling? Just wondered if it would be suitable for a timber framed structure on level as well as unlevel ground.
Helical piles are perfect for a timber frame structure. They are designed to take direct point loads which compliments timber posts.
Hi. The one thing they don’t discuss in this article is a discussion of the details when your posts are going into a sill right at the corner of where two sills meet and what are the recommendations for tenon size and length etc at the bottom of that post, distances from the edge of the sill to the mortise….. Best practices.
I’ve seen these where the tenons just slide into the mortise there and then are pegged (maybe). Is this a safe way to let a structure just rest and sit in those mortises? With all of the wind loads on the structure? Seems sketchy or am I missing something. Please advise.
Thanks
Checkout https://timberframehq.com/sill-plate-to-post-joinery/.
I am beginning to plan an addition (24’x36′)onto my home which has a basement with concrete block walls. I am hoping to build a basement for the addition as well. Would concrete blocks work well for this? I would also like to timber frame the floor sills and joists. Would this be possible or should I use TGI like indicated in the diagram?
You can use concrete blocks, you will need to fill the cores and use a larger width block where the posts are to provide enough bearing support. You can absolutely use a timbered floor system but I do not recommend it. It will greatly effect the easy of installing any mechanicals and for the most part you will not see the timbers or joinery.